![]()
OnMusic Education for the Non-Music Majors
(ISBN 097 206273 2) CD
Quick Setup Guide
This Quick Setup Guide will help you through the Registration process and properly setup your computer.
Quick Setup Guide- Step 1: Register CD-ROM Serial Number
- Step 2: Download Necessary Software
- Step 3: CD-ROM Setup
- Step 4: Test Computer Setup
Step 1: Register CD-ROM Serial Number
- Go to www.student.connect4education.com
- Click Registration.
- Complete the Registration form and click Submit.
![]()
Step 2: Download Necessary Software
- The following free software is required for this OnMusic Education course.
PC Users
|
Macintosh Users
|
| Adobe Flash Player | Adobe Flash Player |
| Sibelius Scorch | Sibelius Scorch |
| *Windows Users: You do not need to install this. Most likely it's already installed on your computer. | *Macintosh Users: You do not need to install this. Most likely it's already installed on your computer. |
![]()
If you are a PC user, click PC Users.
If you are a Macintosh user, click Macintosh Users.
All the multimedia resources for the course music, graphics, and interactive content are on the course CD-ROM. Please make sure the CD-ROM is in the CD-ROM drive, and the CD-ROM Setup is done properly.
WARNING: If you do not do the CD-ROM Setup properly, you will not be able to listen to music, see pictures, or view interactive content in the quizzes, exams, and course pages.
- Insert CD1 into the CD-ROM drive. Wait for 10 seconds.
Windows XP users: If a new window pops up and asks "What do you want Windows to do?", click Cancel.
CD PackageName of CD 1Name of CD 2OnMusic Education for the Non-Music Majors (ISBN 0-9720627-3-2) OMENM1OMENM2
- Double-click "My Computer" icon on your desktop. If you do not have a "My Computer" icon on your deskstop, click Start button and click "My Computer."
In the "My Computer" window, you should see OMENM1, and the drive letter beside the name of the CD-ROM disk.
Sample Picture for PC Windows Users
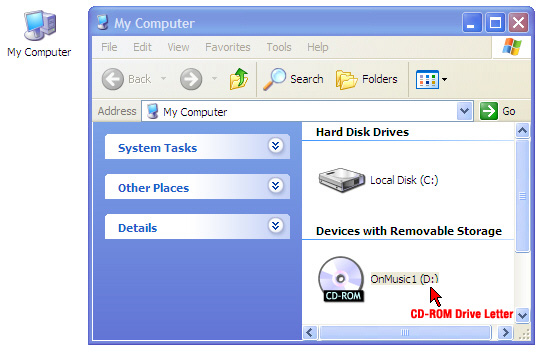
- Please write down your CD-ROM drive letter. You will need this information to complete the CD-ROM Setup process.
- Go to www.connect4education.org
- Type your Login Name and Password. Click Logon.
- Inside the course website, select CD-ROM Setup from My Settings on the grey tab menu below the course banner on the top of the page.

- Under the My Settings column, click CD-ROM Setup.
- Follow the PC Users directions on the CD-ROM Setup page.
- After you complete the setup, you should receive a confirmation that your CD-ROM setup has been changed.
IMPORTANT: You will need to do the CD-ROM Setup whenever you switch to a different computer.
![]()
CD-ROM Setup for Macintosh Users
All the multimedia resources for the course music, graphics, and interactive content are on the course CD-ROMs. Please make sure the correct CD-ROM is in the CD-ROM drive, and the CD-ROM Setup is done properly.
WARNING: If you do not do the CD-ROM Setup properly, you will not be able to listen to music, see pictures, or view interactive content in the quizzes, exams, and course pages.
- Insert CD1 into the CD-ROM drive. Wait for 10 seconds.
CD PackageName of CD 1Name of CD 2OnMusic Education for the Non-Music Majors (ISBN 0-9720627-3-2) OMENM1OMENM2
- You should see the OMENM1 CD icon on your desktop. If you do not see OMENM1 CD, take out the CD and re-insert it.
- Go to www.connect4education.org
- Type your Login Name and Password. Click Logon.
- Inside the course website, select CD-ROM Setup from My Settings on the grey tab menu below the course banner on the top of the page.
- Under the My Settings column, click CD-ROM Setup.
- Follow the Macintosh Users directions on the CD-ROM Setup page.
- After you complete the setup, you should receive a confirmation that your CD-ROM setup has been changed.
IMPORTANT: You will need to do the CD-ROM Setup whenever you switch CDs.
![]()
- Click the "HOME" tab.
- Under Class 1, click THE KEYBOARD: Introduction.
- Allow the page to fully load.
- In the Definition section you should see the first picture of the full size keyboard. Do you see it?
xxxxxIf you see the picture, your CD-ROM Setup is set properly.
xxxxxIf you do not see it, you will need to redo Step 3: CD-ROM Setup in the Quick Setup Guide section.
At this point, you should be able to view the picture of the full size keyboard.
WARNING: Do not do any course work until you can view images and listen to music pieces. If you do not do the CD-ROM Setup properly, you will not be able to listen to music, see pictures, or view interactive content in the quizzes, exams, and course pages.
![]()
CONGRATULATIONS!
You are now ready to start to the course. The Introduction page is accessible through the gray tab menu below the course banner on the top of the page. Please read the Course Preamble page to get additional information regarding your OnMusic Education course.
![]()